[스프링 입문을 위한 자바 객체지향의 원리와 이해] 7장 내용정리
2022.04.08 - [IT 책 독서록] - [스프링 입문을 위한 자바 객체 지향의 원리와 이해] 6장 내용정리
[스프링 입문을 위한 자바 객체 지향의 원리와 이해] 6장 내용정리
6장은 스프링 프레임워크에서 사용하고있는 디자인 패턴 8개를 다룬다. 디자인 패턴 자체가 이 책만으로 이해하기에는 이 책의 내용이 부족하기 때문에 별도의 책을 보는 것을 권장하고있다. 이
blog.robinjoon.space
7장은 스프링에 적용된 핵심 원리인 IOC/DI, AOP, PSA에 대해 다룬다.
DI (의존성 주입)
객체지향 프로그래밍에서 의존성이란 한 객체가 다른 객체를 사용하는 것을 말한다.
예를 들어 다음 코드를 보자.
public class Car{
    Tire tire;
    public Car(){
        this.tire = new KoreaTire();
        //this.tire = new AmericaTire();
    }

    public String getTireBrand(){
        return "장착된 타이어: "+ tire.getBrand();
    }
}

interface Tire{
    String getBrand();
}

public class KoreaTire implements Tire{
    public String getBrand(){
        return "Korea Tire";
    }
}

public class AmericaTire implements Tire{
    public String getBrand(){
        return "America Tire";
    }
}
이 코드에서 Car 의 생성자 내부에서 new 연산자를 통해 Tire 객체를 생성했다. 즉, 의존 관계가 일어나고 있는 것이다.
이런 코드는 Car 클래스 내부에서 직접 Tire 객체를 생성하므로 유연성이 떨어진다. 만일, KoreaTire가 아닌 AmericaTire를 사용하고 싶다면 Car 클래스를 변경해야만 한다. 이런 이유로 의존되는 객체를 의존하는 객체 내부에서 만드는 것이 아니라, 외부로부터 전달받는 즉, 외부에서 주입하게 되었고 이것을 의존성 주입, Dependency Injection 이라고 한다.
스프링 없이 의존성 주입하기 - 생성자
생성자를 이용해 의존성을 주입할 수 있다. 달라지는 부분은 Car 클래스 뿐이다.
public class Car{
    Tire tire;
    public Car(Tire tire){
        this.tire = tire;
    }

    public String getTireBrand(){
        return "장착된 타이어: "+ tire.getBrand();
    }
}
이렇게 되면 사용할 타이어가 변경되어도 Car 클래스가 변경되지는 않는다. 즉, 훨씬 더유연한 코드를 작성할 수 있게 된다.
스프링 없이 의존성 주입하기 - 속성 접근자(setter)
만일, Car가 의존하는 Tire 종류가 자주 변경될 수 있다면, 생성자를 이용하는 것 보단, setter 메서드를 이용하는 것이 좋을 수도 있다. 이로 인해 가져오는 이점은 생성자를 이용한 것과 같다. 달라지는 코드는 그저 setter가 추가되는 것이니 생략하겠다.
스프링으로 의존성 주입하기 - XML에서 속성주입
<?xml version="1.0" encoding="UTF-8"?>
<beans xmlns="http://www.springframework.org/schema/beans"
	xmlns:xsi="http://www.w3.org/2001/XMLSchema-instance"
	xsi:schemaLocation="http://www.springframework.org/schema/beans
		http://www.springframework.org/schema/beans/spring-beans.xsd">

	<bean id="koreaTire" class="expert003.KoreaTire"></bean>

	<bean id="americaTire" class="expert003.AmericaTire"></bean>

	<bean id="car" class="expert003.Car">
		<property name="tire" ref="koreaTire"></property>
		<!--
		<property name="tire" ref="americaTire"></property>
		-->
	</bean>

</beans>
이런 xml 설정을 통해 스프링 컨테이너가 Car 객체를 생성할 때 속성 주입 방식으로 KoreaTire 객체를 생성해 주입한다.
만약 주입되는 객체를 AmericaTire로 변경하고 싶다면 property 태그의 ref 값을 americaTire 로 변경하면 코드의 재컴파일이나 빌드 없이 변경할 수 있다.
스프링으로 의존성 주입하기 - @Autowired를 통한 속성 주입
자바 코드에 @Autowired 를 이용해 스프링 컨테이너가 알아서 적절한 객체를 주입하도록 할 수도 있다. 아래는 설정 xml 코드와, 변경된 Car 클래스 코드다.
<?xml version="1.0" encoding="UTF-8"?>
<beans xmlns="http://www.springframework.org/schema/beans"
	xmlns:xsi="http://www.w3.org/2001/XMLSchema-instance" xmlns:context="http://www.springframework.org/schema/context"
	xsi:schemaLocation="http://www.springframework.org/schema/beans http://www.springframework.org/schema/beans/spring-beans.xsd
		http://www.springframework.org/schema/context http://www.springframework.org/schema/context/spring-context-3.1.xsd">

	<context:annotation-config />

	<bean id="tire" class="expert004.KoreaTire"></bean>

	<bean id="wheel" class="expert004.AmericaTire"></bean>

	<bean id="car" class="expert004.Car"></bean>
</beans>
package expert004;
import org.springframework.beans.factory.annotation.Autowired;
public class Car {
@Autowired
Tire tire;
public String getTireBrand() {
return "장착된 타이어: " + tire.getBrand();
}
}@Autowired 어노테이션은 아래와 같은 방식으로 동작한다.
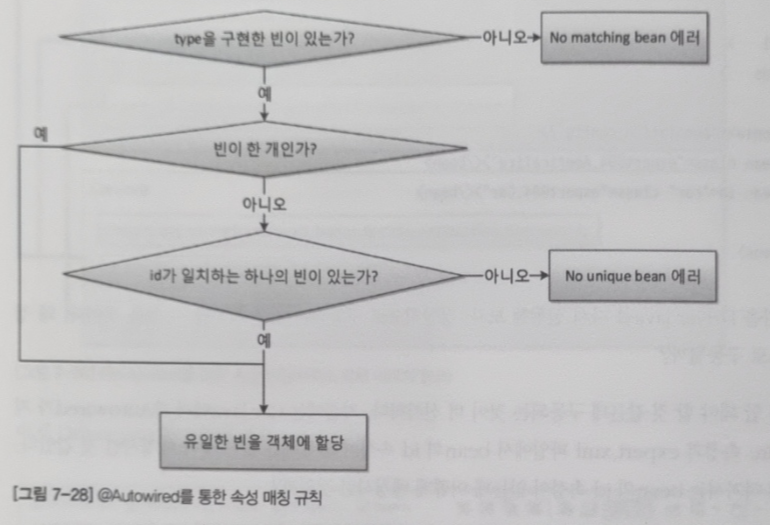
xml 코드에서 id를 tire로 지정한 Tire 타입의 bean이 가장 적절한 주입대상으로 판단해 의존성을 주입한다.
자바 자체에서 제공하는 @Resource 라는 어노테이션을 사용할 수도 있지만, 약간 동작 방식이 다르다. 별도로 학습하여야 한다.
AOP - 관점 지향 프로그래밍
스프링 DI가 의존성 주입이라면, 스프링 AOP는 로직의 주입이라고 할 수 있다. 우리가 여러 모듈을 작성하다보면, 로깅, 보안 등 각각의 모듈에 공통적으로 들어가는 부분이 존재하게 된다. 이런 것을 AOP 에선 횡단 관심사 라고 한다. 반대로, 각각의 모듈이 해야할 고유의 것들을 핵심 관심사 라고 부른다.
코드 = 핵심 관심사 + 횡단 관심사
프로그래머라면 이런 공통된 부분을 자연스럽게 한곳에 묶어 관리하고 싶어진다. AOP는 여기서 한 발 더 나아간다.
스프링 AOP는 로직의 주입이라고 했다. 스프링 AOP에서 로직이 주입가능한 시점은 다음과 같이 5지점이 있다.
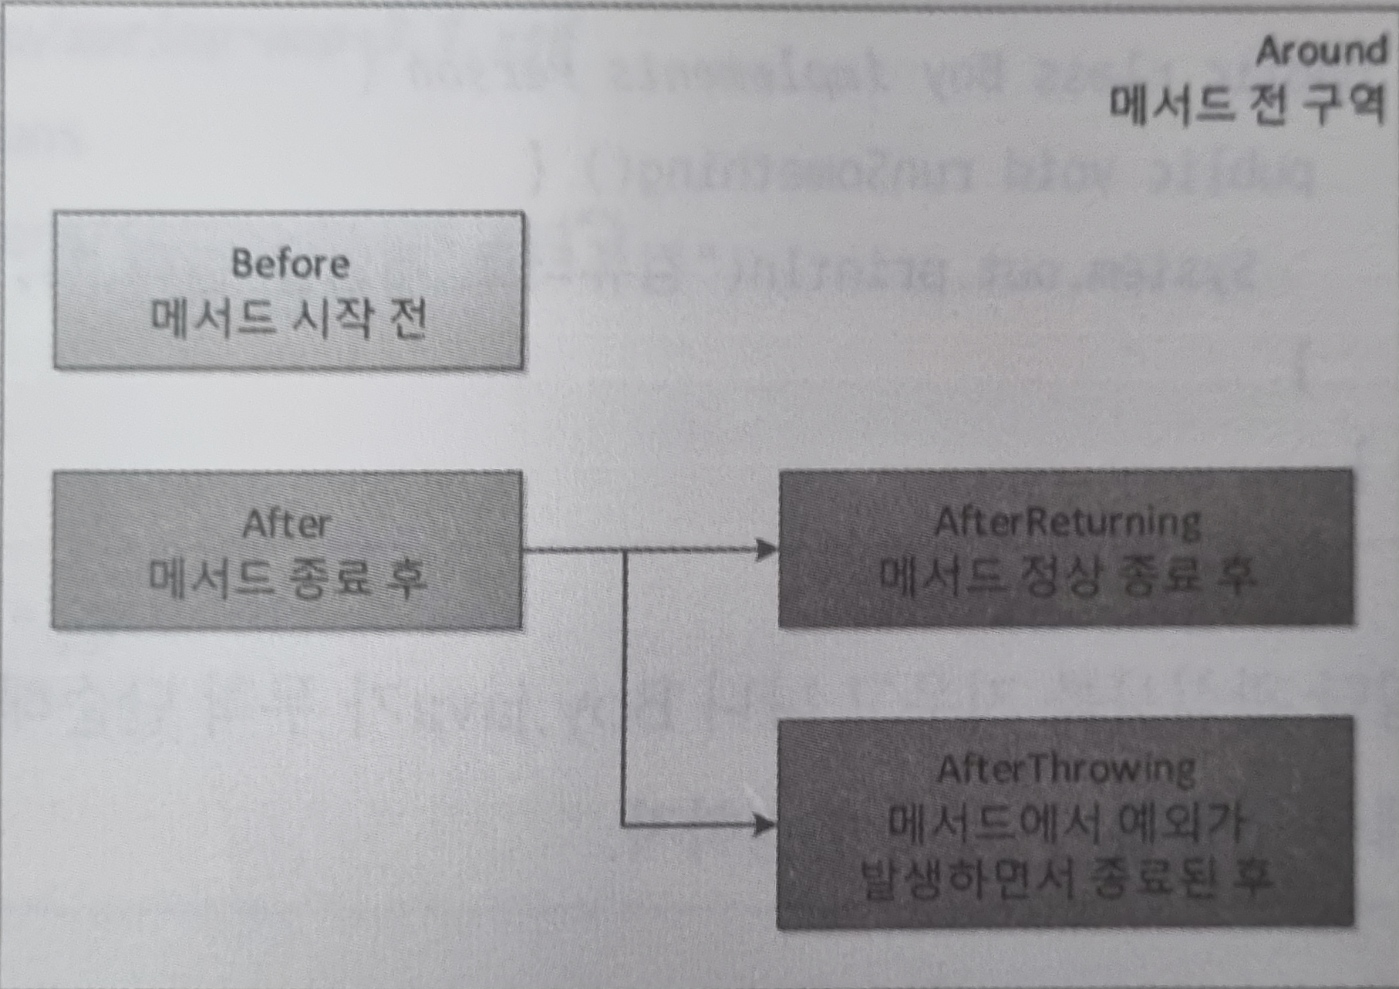
스프링 AOP에선 횡단 관심사를 별도의 클래스의 메서드로 분리하고, 필요한 곳에 실행 시점을 지정하여 주입하게 된다.
아래는 스프링 AOP를 적용하기 이전의 코드다.
package aop001;

public class Boy {
    public void runSomething() {
        System.out.println("열쇠로 문을 열고 집에 들어간다.");

        try {
            System.out.println("컴퓨터로 게임을 한다.");
        } catch (Exception ex) {
            if (ex.getMessage().equals("집에 불남")) {
                System.out.println("119 에 신고한다.");
            }
        } finally {
            System.out.println("소등하고 잔다.");
        }

        System.out.println("자물쇠를 잠그고 집을 나선다.");
    }
}
package aop001;
public class Girl {
public void runSomething() {
System.out.println("열쇠로 문을 열고 집에 들어간다.");
try {
System.out.println("요리를 한다.");
} catch (Exception ex) {
if (ex.getMessage().equals("집에 불남")) {
System.out.println("119 에 신고한다.");
}
} finally {
System.out.println("소등하고 잔다.");
}
System.out.println("자물쇠를 잠그고 집을 나선다.");
}
}package aop001;
public class Start {
public static void main(String[] args) {
Boy romeo = new Boy();
Girl juliet = new Girl();
romeo.runSomething();
juliet.runSomething();
}
}아래는 Boy 클래스에 AOP를 적용한 코드다. 모든 횡단 관심사를 AOP로 적용한 것은 아니고, 핵심 관심사 이전에 수행되는 횡단 관심사만 살려서 AOP로 적용한 코드다.
package aop002;

public interface Person {
    void runSomething();
}
package aop002;
public class Boy implements Person {
public void runSomething() {
System.out.println("컴퓨터로 게임을 한다.");
}
}package aop002;
import org.aspectj.lang.JoinPoint;
import org.aspectj.lang.annotation.Aspect;
import org.aspectj.lang.annotation.Before;
@Aspect
public class MyAspect {
@Before("execution(* runSomething())")
public void before(JoinPoint joinPoint) {
System.out.println("얼굴 인식 확인: 문을 개방하라");
// System.out.println("열쇠로 문을 열고 집에 들어간다.");
}
}<?xml version="1.0" encoding="UTF-8"?>
<beans
xmlns="http://www.springframework.org/schema/beans"
xmlns:xsi="http://www.w3.org/2001/XMLSchema-instance"
xmlns:aop="http://www.springframework.org/schema/aop"
xsi:schemaLocation="
http://www.springframework.org/schema/aop
http://www.springframework.org/schema/aop/spring-aop-3.1.xsd
http://www.springframework.org/schema/beans
http://www.springframework.org/schema/beans/spring-beans.xsd">
<aop:aspectj-autoproxy />
<!--<bean class="org.springframework.aop.aspectj.annotation.AnnotationAwareAspectJAutoProxyCreator" /> -->
<bean id="myAspect" class="aop002.MyAspect" />
<bean id="boy" class="aop002.Boy" />
<bean id="girl" class="aop002.Girl" />
</beans>@Aspect 어노테이션을 통해 횡단관심사를 작성한 클래스임을 명시하고, @Before 어노테이션을 통해 어떤 메서드가 실행되기 전에 실행하겠다고 설정한 것이다.
스프링 AOP는 프록시 패턴을 이용해 횡단 관심사를 핵심 관심사에 주입한다.